Your Ad Here
Your Ad Here

In Facebook

Popular Topics

ജാലകം
Showing posts with label OS. Show all posts

Windows Server 2012

12 July, 2012


Windows Server 2012, formerly codenamed Windows Server 8, is the next release of Windows Server currently under development by Microsoft. It is the server version of Windows 8 and the successor to Windows Server 2008 R2. Windows Server 2012 will be the first version of Windows Server to have no support for Itanium-based computers since Windows NT 4.0. A developer preview (a pre-beta release) was released on 9 September 2011 to MSDN subscribers. On March 1, 2012, Microsoft issued a public beta (build 8250). On April 17, 2012, Microsoft announced the product name would be Windows Server 2012.. On May 31, 2012, Microsoft announced the release candidate (RC) for Windows Server 2012

Main Features of Windows server 2012:  

 1. User Interface
 2. Task Manager
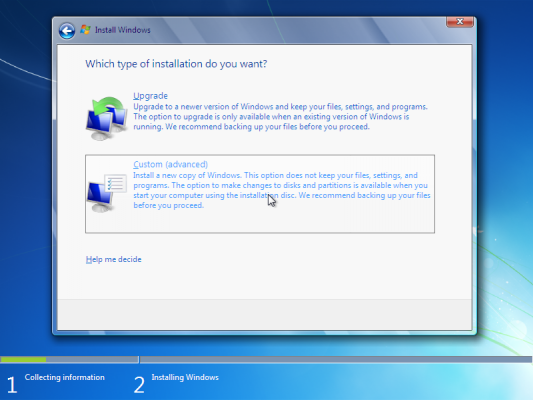
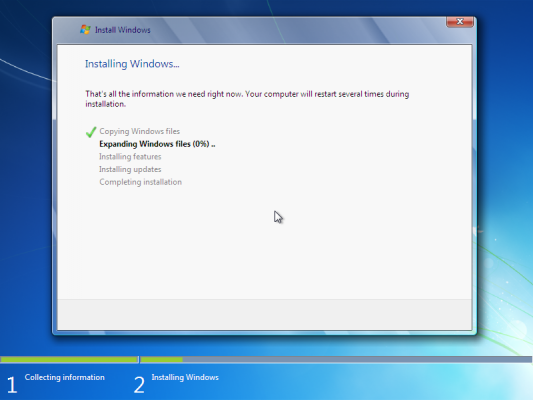
 3. Installation option
 4. IP Address management
 5. Active Directory
 6. Hyper-V
 7. Cloud

System Requirement:

Architecture: 64 Bit

CPU- 1.4 Ghz
Memory - 512 MB
Hard disk Space - 32 GB (more if there is 16 GB of RAM or more)

Editions
1. Foundation
2. Essential
3. Standared
4. Datacenter
Continue Reading | comments

How to Create a System Image in Windows 7

10 January, 2012


We can take a backup image of our machine without the need for a third party utility like Ghost or True Image. You just just finished installing a fresh copy of Windows 7 on your computer and have it set up to your liking. One of the first things you should do now is create an image of the disc so in the event of a crash you will be able to restore it to its current state. An image is an exact copy of everything on the drive and will restore it back to its current state. It’s probably best to create an image when everything is clean and organized on your system.
This will make the image file smaller and allows you to restore the system with a smooth running set up.

Creating an Image in Windows 7

Click on Start go to Getting Started and then select Back up your files. 


Next click on the Create a system image hyperlink.


Decide where you want to save the image. You can choose an external drive, burn to multiple DVD’s, or store it on a network location.


You can include other drives if you want as well but remember that will add to the size of the final image.


At the confirmation screen notice the amount of space the image may take. If something doesn’t look right you can still go back from this point and make adjustments.


A progress meter is displayed while the images is created and backed up. In this example a disk of about 15GB in size took under 20 minutes backed up to an external drive. Times will vary depending on your system and where you’re backing it up to.


After the process is complete you get the option to create a system repair disc which you should do and make sure to save it in a secure location.


When it comes time to restore the image, you will be able to use the System Recovery Options to get the system back.


Reference Link: Click Here


Continue Reading | comments

How to Fix Msvcp71.dll and Msvcr71.dll missing error

29 December, 2011


Do you get Msvcp71.dll and Msvcr71.dll missing error when running a program in Windows 7? Both are Microsoft C Runtime Library files and it seems as if Microsoft forgot to add them to Windows 7. Some programs require you to have both files for it to work successfully.


We have uploaded both dll files for you(grab them from the bottom of this page),
but the bigger question is how to install them?
Before we begin, have a look at the errors in the screenshot below.
msvcp71.dll  - msvcr71.dll error windows 7

Installation In Windows 7 32-bit OS

If you are using Windows 7 32-bit then you need to put both dll files inside Windows/System32 folder as shown in the screenshot below.

dll files to system 32 windows 7

Installation In Windows 7 64-bit OS

If you are using Windows 7 64-bit then you need to put both dll files inside the Windows/SysWOW64 folder as shown in the screenshot below.


We have put both dll files inside one zip archive, simply extract them and follow the above guidelines to install them.

Download Link
OR

Mirror
Continue Reading | comments

How to use parental Controls in Windows 7

23 December, 2011


 Parental constrols help you manage how you want others to use the computer. For example, you can set limits on the hours that your children can use the computer, the types of games they can play, and the programs they can run.

When Parental Controls blocks access to a game or program, a notification is displayed that the program has been blocked. Your child can click a link in the notification to request permission for access to that game or program. You can allow access by entering your account information.


Note: To Set up Parental Controls for any user, you'll need your own administrator user account. Before you get started, make sure each user/person that you want to set up Parental Controls for has a standard user account. Parental Controls can be applied only to standard user accounts.

Steps to Apply Parental Controls:

1. Click the Start button to view the Start Menu and then choose the Control Panel option.


2. The Control Panel window opens up. Click on the All Control Panel Items.


3. Window shows all control panel items. Click on Parental Controls.


If you are prompted for an administrator password or confirmation, type the password or provide confirmation. Window opens up.


4. Click the standard user account that you want to set Parental Controls for. Eg. Click on Child account.


5. Under Parental Controls, click On, enforce current settings.


6. Once you've turned on Parental Controls for your child's standard user account, you can adjust the following individual settings that you want to control:

6.1 Time limits. Click Time Limits. You can set time limits to control when children are allowed to log on to the computer. Time limits prevent children from logging on during the specified hours. You can set different logon hours for every day of the week. If they're logged on when their allotted time ends, they'll be automatically logged off. Click Ok.


6.2 Games. Click on Games. You can control access to games, choose an age-rating level, choose the types of content you want to block, and decide whether you want to allow or block unrated or specific games.


Specify which games children can play. Click on Set game ratings, the window opens up.


6.3 Block or allow specific games.


7. Allow or block specific programs. You can prevent children from running programs that you don't want them to run.

Click on Allow or block specific programs in the User Control window.


Choose the option Child can only use the programs I allow and check the programs from the list you want to allow and click Ok.


Click Ok to apply Parental Controls to the account Child.
Continue Reading | comments

Windows7 installation Step By Step

10 October, 2011


Just like another operating system Windows 7 also has some kind of hardware requirements. Make sure your computer is ready to install Windows 7.


1 GHz 32-bit or 64-bit processor.
1 GB RAM for 32-bit Windows 7 OR 2 GB RAM for 64-bit Windows 7.
16 GB available disk space 32-bit Windows 7 OR 20 GB for 64-bit Windows 7.
Support for DirectX 9 graphics with 128 MB memory (in order to enable Aero theme).
DVD-R/W Drive.
Internet or phone access to activate Windows 7.


Perform Windows 7 Clean Installation:

Clean installation is a process of putting an entirely new installation of Windows. In order to perform a clean installation of Windows 7, you should format and completely erase data on your hard drive. During a clean installation, the operating system files are installed in a new folder, and you must reinstall all of your applications and reconfigure user preferences, such as desktop and application settings.

On the other side when you upgrade, existing user settings are retained, as are installed applications and application settings. An upgrade is a new version of or addition to a hardware or, more often, software product that is already installed or in use.

Microsoft recommends you to upgrade your existing operating system to Windows 7, but if you are running Windows XP then you cannot go for this upgrade option. In that scenario you need to perform a clean installation of Windows 7. But don’t forget to take a backup of your data before you initiate a clean installation.


32-bit or 64-bit Version?


You need to decide whether to install the 32-bit or 64-bit version of Windows 7. The Windows 7 installation disc package includes both 32-bit and 64-bit versions of Windows 7. Basically, the 64-bit version of Windows handles large amounts of random access memory (RAM) more effectively than a 32-bit system. So if you plan on using Windows 7 on a computer with more than 3 GB or RAM, I would strongly suggest to use the 64-bit version. Most programs designed for the 32-bit version of Windows will work on the 64-bit version of Windows, and if they don't, you can always use Windows XP Mode.


Beginning the Installation Process


When installing on a physical computer insert your Windows 7 DVD media into your DVD drive and reboot your computer. If you're asked to press a key to boot from DVD or CD, press any key. A black window will appear momentarily while the DVD content is read.


Next, a Starting Windows screen will appear.


The Installation Process

Like in Windows Vista and Windows Server 2008, and unlike previous versions of Windows, Windows 7 does not have a noticeable text phase of the setup process, and it will boot directly into the Graphical User Interface (GUI) mode.


After a few moments you will see the first prompt:


Click "Next" unless you want to change some regional settings for the installation process. 


Click on the "Install now" button.

Next, accept the license terms and click on "Next".


Next, unless you're upgrading an existing Windows installation, press the Custom (Advanced) installation type button. Note that in this case, the Upgrade button is disabled because this specific installation if performed on a new computer without any previous operating system on it.


The next phase is to pick the installation partition. Since this computer has a new hard disk that hasn't been formatted before, you will only have the option to create a new partition on it.
If you don't want to specify a specific partition to install Windows on, or create partitions on your hard disk, click Next to begin the installation. If you already have another existing partition with enough free space and want to install the Windows 7 on that partition to create a multiboot configuration, select the partition you want to use, and then click Next to begin the installation. If you want to create, extend, delete, or format a partition, click Drive options (advanced), click the option you want, and then follow the instructions.
Since I don't need to perform any additional task I will just click on the "Next" button. The installation process will then create a partition on all the available disk space, and format it.


The setup process will now begin to copy files from the installation DVD media to the hard disk.


Process could take a while depending on the type of hardware your computer uses. In my VM test sample I've used for this demo, the entire process finished before I could finish writing the previous 3 paragraphs, so it could be pretty quick.
The computer will reboot, and the next thing you'll see is the prompt to set the user's and computer's name. By default, the computer's name will be username-PC, where username is the username you've entered.
Note: The user you're creating will be the only user currently available on the system. Like Vista, the built-in Administrator's account is disabled. 

Click on "Next".


Enter the user's password. Remember this password, as it will be the ONLY user on the system, and unless you create an additional user or enable the built-in administrator account, if you forget this password you'll need to crack it to gain access to the system.

You must also enter a password hint.

Click on "Next".


Next, type in your product key. If you do not have the product key at hand you can still click "Next", and proceed with the installation. You will be asked to enter the product key after Windows is installed.


Choose what sort of protection your computer gets. The recommended settings are best for someone that doesn't plan to hide their computer behind a corporate firewall (and even then, in some cases, this would be the best option). If you plan to install a 3rd-party firewall later you can opt to be prompted later. Note that this setting will also have effect on how the computer uses the Microsoft Windows Update (Automatic Updates) features.


Choose your time zone and location and click on "Next".


Select your network location type. This setting can be changed later, but do note that choosing a profile will have effect on the Windows Firewall and sharing settings. Click on "Next".


Windows will finalize the settings and your desktop will appear.


Continue Reading | comments
 
Copyright © 2011. Server Training . All Rights Reserved
Company Info | Contact Us | Privacy policy | Term of use | Widget | Advertise with Us | Site map