Your Ad Here
Your Ad Here

In Facebook

Popular Topics

ജാലകം
Showing posts with label OSinstallation. Show all posts

Windows7 installation Step By Step

10 October, 2011


Just like another operating system Windows 7 also has some kind of hardware requirements. Make sure your computer is ready to install Windows 7.


1 GHz 32-bit or 64-bit processor.
1 GB RAM for 32-bit Windows 7 OR 2 GB RAM for 64-bit Windows 7.
16 GB available disk space 32-bit Windows 7 OR 20 GB for 64-bit Windows 7.
Support for DirectX 9 graphics with 128 MB memory (in order to enable Aero theme).
DVD-R/W Drive.
Internet or phone access to activate Windows 7.


Perform Windows 7 Clean Installation:

Clean installation is a process of putting an entirely new installation of Windows. In order to perform a clean installation of Windows 7, you should format and completely erase data on your hard drive. During a clean installation, the operating system files are installed in a new folder, and you must reinstall all of your applications and reconfigure user preferences, such as desktop and application settings.

On the other side when you upgrade, existing user settings are retained, as are installed applications and application settings. An upgrade is a new version of or addition to a hardware or, more often, software product that is already installed or in use.

Microsoft recommends you to upgrade your existing operating system to Windows 7, but if you are running Windows XP then you cannot go for this upgrade option. In that scenario you need to perform a clean installation of Windows 7. But don’t forget to take a backup of your data before you initiate a clean installation.


32-bit or 64-bit Version?


You need to decide whether to install the 32-bit or 64-bit version of Windows 7. The Windows 7 installation disc package includes both 32-bit and 64-bit versions of Windows 7. Basically, the 64-bit version of Windows handles large amounts of random access memory (RAM) more effectively than a 32-bit system. So if you plan on using Windows 7 on a computer with more than 3 GB or RAM, I would strongly suggest to use the 64-bit version. Most programs designed for the 32-bit version of Windows will work on the 64-bit version of Windows, and if they don't, you can always use Windows XP Mode.


Beginning the Installation Process


When installing on a physical computer insert your Windows 7 DVD media into your DVD drive and reboot your computer. If you're asked to press a key to boot from DVD or CD, press any key. A black window will appear momentarily while the DVD content is read.


Next, a Starting Windows screen will appear.


The Installation Process

Like in Windows Vista and Windows Server 2008, and unlike previous versions of Windows, Windows 7 does not have a noticeable text phase of the setup process, and it will boot directly into the Graphical User Interface (GUI) mode.


After a few moments you will see the first prompt:


Click "Next" unless you want to change some regional settings for the installation process. 


Click on the "Install now" button.

Next, accept the license terms and click on "Next".


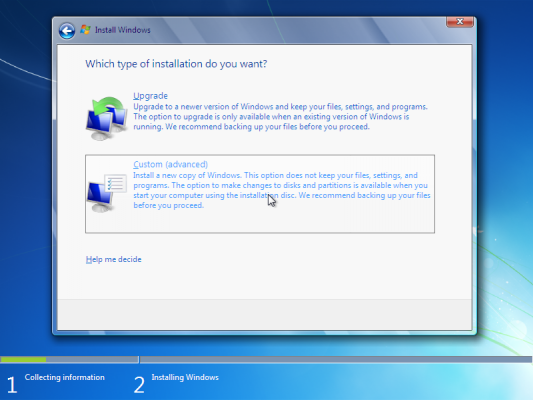
Next, unless you're upgrading an existing Windows installation, press the Custom (Advanced) installation type button. Note that in this case, the Upgrade button is disabled because this specific installation if performed on a new computer without any previous operating system on it.


The next phase is to pick the installation partition. Since this computer has a new hard disk that hasn't been formatted before, you will only have the option to create a new partition on it.
If you don't want to specify a specific partition to install Windows on, or create partitions on your hard disk, click Next to begin the installation. If you already have another existing partition with enough free space and want to install the Windows 7 on that partition to create a multiboot configuration, select the partition you want to use, and then click Next to begin the installation. If you want to create, extend, delete, or format a partition, click Drive options (advanced), click the option you want, and then follow the instructions.
Since I don't need to perform any additional task I will just click on the "Next" button. The installation process will then create a partition on all the available disk space, and format it.

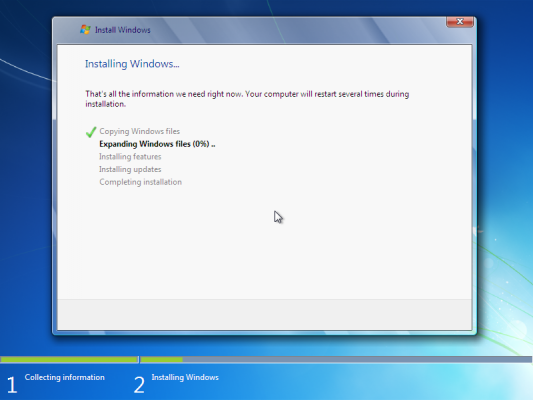
The setup process will now begin to copy files from the installation DVD media to the hard disk.


Process could take a while depending on the type of hardware your computer uses. In my VM test sample I've used for this demo, the entire process finished before I could finish writing the previous 3 paragraphs, so it could be pretty quick.
The computer will reboot, and the next thing you'll see is the prompt to set the user's and computer's name. By default, the computer's name will be username-PC, where username is the username you've entered.
Note: The user you're creating will be the only user currently available on the system. Like Vista, the built-in Administrator's account is disabled. 

Click on "Next".


Enter the user's password. Remember this password, as it will be the ONLY user on the system, and unless you create an additional user or enable the built-in administrator account, if you forget this password you'll need to crack it to gain access to the system.

You must also enter a password hint.

Click on "Next".


Next, type in your product key. If you do not have the product key at hand you can still click "Next", and proceed with the installation. You will be asked to enter the product key after Windows is installed.


Choose what sort of protection your computer gets. The recommended settings are best for someone that doesn't plan to hide their computer behind a corporate firewall (and even then, in some cases, this would be the best option). If you plan to install a 3rd-party firewall later you can opt to be prompted later. Note that this setting will also have effect on how the computer uses the Microsoft Windows Update (Automatic Updates) features.


Choose your time zone and location and click on "Next".


Select your network location type. This setting can be changed later, but do note that choosing a profile will have effect on the Windows Firewall and sharing settings. Click on "Next".


Windows will finalize the settings and your desktop will appear.


Continue Reading | comments

Upgade Vista to windows 7

06 September, 2011


From within Windows Vista, insert the Windows 7 Setup DVD and choose Run from the AutoPlay dialog.


Windows Vista to Windows 7 upgrade
Choose Install Now.

Windows Vista to Windows 7 upgrade

Always go online to get the latest updates. Doing so will result in a better install experience.

Windows Vista to Windows 7 upgrade

Accept the EULA (end user license agreement).

Windows Vista to Windows 7 upgrade

Choose Upgrade from the installation type screen.
At this point, an integrated version of the Windows 7 Upgrade Advisor runs behind the scenes and tests your PC to see that it meets the Windows 7 system requirements and that your hardware and software is compatible with the new OS. There are a variety of issues that can come up at this phase of Setup, including issues that may cause Setup to end prematurely. Some issues are minor. For example, if you are upgrading from Windows Vista Ultimate, Setup will inform you that Windows Vista Ultimate Extras have been discontinued and that these tools will no longer be available after the upgrade.

Windows Vista to Windows 7 upgrade

Windows Vista to Windows 7 upgrade

Setup will alert you if any currently installed applications are incompatible with Windows 7 and, in some cases, recommend reinstalling these applications after the upgrade for best results. Other issues are more disruptive. If Vista is waiting on a Windows Update-based reboot, for example, Setup will halt and inform you to reboot before trying again.

Windows Vista to Windows 7 upgrade

Once you've passed muster with the Compatibility Report, you'll be confronted with the familiar Install Windows phase of Setup. This works identically to the same phase of Setup during a clean install, but with one important change. In addition to the Copying Windows files; Gathering files, settings, and programs; Expanding Windows files; and Installing features and updates steps, you'll see an additional step during an in-place upgrade. It's called Transferring files, settings, and programs, and this is the part that takes a number of hours to complete. Because of the variable length of this part of Setup, it provides a continuous update to its progress.


Windows Vista to Windows 7 upgrade

During Setup, you PC will also reboot a number of times. When that's finally done, you'll enter into a shortened version of the post-Setup tasks you perform during a clean install. You're aked to input your product key (which is optional), configure Automatic Updates, review time and date settings (which, unlike with a clean install, should already be correct), configure a network locations (Home, Work, or Public network), (optionally) and configure HomeGroup sharing.

Windows Vista to Windows 7 upgrade

Windows Vista to Windows 7 upgrade

Windows Vista to Windows 7 upgrade

Windows Vista to Windows 7 upgrade

Windows Vista to Windows 7 upgrade


When that's done, Setup will prepare your Windows 7 desktop.
Continue Reading | comments

Upgarde Windows Xp to Windows 7

05 September, 2011


Windows XP does not allow you to perform an in-place upgrade to Windows 7. In fact, if you try to perform an in-place upgrade, you'll see the following error message.


Windows XP to Windows 7 upgrade

Instead, you'll need to use a built-in utility on the Windows 7 Setup DVD called Windows Easy Transfer to transfer your documents and settings from your XP-based PC to a backup location first. Then, you will perform a clean install of Windows 7 and then use Windows Easy Transfer on the new install to copy over all your settings and data. This process is called a migration.

The downsides to a migration are many but not insurmountable. If you intend to install Windows 7 on the same computer as Windows XP, essentially replacing Windows XP with Windows 7, then you will need to be very careful to backup all of your data first. You will also need to reinstall all of your applications after you finish installing Windows 7. Here is a quick rundown of the steps.

1) Backup all of your data and, preferably, the entire hard drive just in case. (Why? Many applications store data in hidden locations and you may discover after the fact that you've wiped out two years of email or whatever.) You should do this even if you are using the Windows Easy Transfer utility as outlined below.

2) If you are installing Windows 7 on the same PC as Windows XP, consider installing it on a different hard drive or partition so that you can keep your XP install in place. This way, you can dual boot between both Windows XP and 7, copy files between the two environments as needed, and fall back to XP if it doesn't work for some reason.

3) Use the Windows Easy Transfer utility (described below) to backup your XP-based documents and other data.

4) Make sure you have access to the application installers you will need.

5) Install Windows 7 over XP or in a different partition or hard drive. (Or, on a different PC all together, which is preferable.)

6) Use the Windows Easy Transfer utility (described below) to restore your XP-based documents and other data to your new Windows 7-based PC.

7) Reinstall your applications.

OK, let's get started.

Secret: Windows Easy Transfer is a way to bridge the 32-bit/64-bit divide as well. While you cannot perform an in-place upgrade between any 32-bit and 64-bit versions of Windows, you can use Easy Transfer to move your settings and documents from a 32-bit version of Windows to a 64-bit version (& vice versa).

 Backing Up Your XP Based Settings & Data
To run Windows Easy Transfer on your XP-based PC, insert the Windows 7 Setup DVD and navigate to D:\support\migwiz (assuming D:\ is your optical drive). Then, run the migsetup.exe application. You'll step through a simple wizard that provides both automatic and manual ways to pick the data you'll back up.
Windows XP to Windows 7 upgrade
Windows Easy Transfer explains what it can backup.

Windows XP to Windows 7 upgrade
You can backup from PC-to-PC with an Easy Transfer cable, or use a network share or USB-based storage device.
 
Windows XP to Windows 7 upgrade
When you run the wizard, Easy Transfer scans each user account for settings and data.


Windows XP to Windows 7 upgrade
When it's done, the wizard will tell you how much space the data will consume.

Windows XP to Windows 7 upgrade
You can globally accept the backup, or dive into the file system to manually choose (or un-choose) data to backup.

Windows XP to Windows 7 upgrade
The resulting Easy Transfer file requires a password.

Windows XP to Windows 7 upgrade
Once you've provided the information the wizard needs, your files are backed up.

Windows XP to Windows 7 upgrade
Backup complete.

Windows XP to Windows 7 upgrade


Windows XP to Windows 7 upgrade 


 Restoring Your XP-Based Settings & Data in Windows7
Once you wiped out Windows XP by clean installing Windows 7 (a straightforward process I will soon document here on the site), you can re-apply your XP-based settings and data. (Alternatively, you can simply apply these settings to another PC running Windows 7.) To do so, run the Windows Easy Transfer wizard on the new Windows 7-based install--this time, it's available via the Start Menu--and step through it, locating your saved Easy Transfer file and re-applying the settings and data to the new system.

Windows XP to Windows 7 upgrade
After locating the Easy Transfer file, you must unlock it by entering the password.

Windows XP to Windows 7 upgrade
You can choose which parts of the backup to restore.

Windows XP to Windows 7 upgrade
Advanced Options lets you map old user accounts and drives to different locations on the target PC if needed.

Windows XP to Windows 7 upgrade
The items are then transferred over...

Windows XP to Windows 7 upgrade
... resulting in a bizarre hybrid-look Windows 7.

Reinstalling your applications

Unfortunately, the migration process does not include a seamless way to reinstall your applications. So once your data has been copied over to your new Windows 7 install, you will need to manually reinstall those applications.
Windows XP to Windows 7 upgrade
Afterwards, you can view the Easy Transfer Reports for information on previously installed applications that you may want to install now in Windows 7.

Continue Reading | comments
 
Copyright © 2011. Server Training . All Rights Reserved
Company Info | Contact Us | Privacy policy | Term of use | Widget | Advertise with Us | Site map