Your Ad Here
Your Ad Here

In Facebook

Popular Topics

ജാലകം
Showing posts with label Software. Show all posts

How to Setup Voice Recognition in Windows 7

15 January, 2012


Speech Recognition technology allows you to control your computer by speaking. When you talk, the software will intelligently decide whether to convert your voice into text, such as to allow you to dictate documents and e-mails, or whether you have given a command that requires it to take an action.

How to Setting Up in WIndows 7
  1. Plug-in your microphone.
  2. Click Start
  3. Search for “speech recognition” and click on Windows Speech Recognition
  4. If this is your first time using Speech Recognition (it likely is, since you’re reading this), a Microphone Setup Wizard will pop-up, asking you to do some stuff
  image
  1.  Follow the instructions, and after your microphone is set up.

    Warning:
    This might take 15 mins – 30 mins. But if you’re new to this, don’t worry, Windows will walk you though.
  2. Try to pay attention during the tutorial, it’ll tell you everything you need to use Window’s Inbuilt Features
  3. After you’re done the tutorial, just click the microphone on the Windows Speech Recognition Bar, and watch the Microphone button glow blue. Now you’re ready to speak… to your computer!

image
That’s all there is to it. A few words of caution though:
  • Dictating to your computer might sound easy, but you’re computer certainly isn’t a human, and chances are that it will only understand you most of the time, missing difficult to interpret words.
  • Be careful when you are talking to someone else and your microphone is turned on.
  • I find that composing your dictation in a program such as Wordpad or Microsoft Word is better than composing in a program like outlook or in a web browser.  You can compose things in Wordpad and then just copy and paste them wherever you want.
  • Make sure you use the correct command instead of typing things on your own, windows learn from it and become better.
Continue Reading | comments

Problem Step Recorder in Windows 7

03 December, 2011


One of tools in Windows 7 is the Problem Steps Recorder (PSR). If you are having a problem with a program or your computer, you can use the PSR to recreate and record the steps you took and the errors/problems encountered. The PSR saves screenshots of each step, saves them in a zip File,
which you in turn send to someone to help you fix the problem. Or, it can be used to show steps you are taking to use a program or application so the developer can see if you did it right.
Here is how to use it: 
Start--->Run , type psr.exe
It looks like this:
Cloudeight InfoAve
Now, it gets real simple! Just click Start Record, 
Recreate your problem or show steps you are taking, etc., and when you are done click Stop Record. You can even add comments to your file. By default, it saves it to your desktop so you can find the zip file easily and you can name it something identifiable.


Once the session has been saved you can open the.ZIP file created by PSR to view the recorded session. The .ZIP file contains a .MHT file which contains an image for each mouse click by the customer highlighted in green.


Continue Reading | comments

Common Problems in Windows

23 November, 2011


Learn about some free software utilities that will help you fix the most common Windows problems. They are all compatible with Windows XP, Vista and Windows 7.

Fix Windows Problems with Free Tools
Q1. I am trying to delete a file from my desktop but
the computer won’t let me do that. Instead, it throws me an error message saying that the file /folder is in use by another program or user.
A: You can either reboot your computer in Safe mode to delete that file or, if you want something more simple, get Unlocker. It’s a free utility that will let you close all the processes that have possibly locked the file and once they are closed, you can then safely delete the file.
Q2. I am trying to play a video file on my computer but the media player says that I am missing certain codecs.
A: You can use a tool like Video Inspector to determine which audio and video codecs are required to play the video file on your computer. Alternatively, you can download a codec package like the K-Lite Pack (Click for Free download) that will let you play virtually any audio and video format on your computer.
Q3. I am running out of disk space on my Windows computer. How can I remove all the unnecessary files from the computer and recover some disk space?
A: There are three things you can do here:
  • Open the Run box and type “cleanmgr” to open the built-in Disk Cleanup utility. It will remove all the temp files and the unnecessary system files that you no longer need.
  • Use WinDirStat to determine where all your disk space has gone. Sometimes files are hidden in sub-directories that you can safely move to other drives or even delete them permanently.
  • Use Duplicate Cleaner to identify and delete all the duplicate files on your hard drives. You can move the duplicates to the recycle bin or, if you want to play safe, to any another folder from where they can be easily recovered.
Q4. My computer takes lot of time to boot-up. I checked the “start-up” folder in the Windows start menu and there aren’t any applications out there.
A:  Type “msconfig” in the Run box to open the “System Configuration” tool and then switch to the “Start-up” tab. Disable all the programs that you don’t need to run during start-up. If you are a power user, you may also switch to the “Services” tab and disable all the unnecessary services.
Autoruns is another excellent utility that shows you what programs are configured to run during system bootup or login.
Q5. I am trying to uninstall a program from my computer but the standard add-remove programs is not letting me through.
A: You can use the free Revo Uninstaller utility to remove every single trace of any program from your computer. Revo can also remove entries from the Windows Registry that may have been left by previous un-installation routines.
Q6. My Windows crashed with a “Blue Screen.” Why?
A: You really need to get in touch with a geek to debug the cryptic Blue Screen errors (aka “Blue Screen of Death”) but if you are lucky, a free utility called BlueScreenView can provide vital clues. Blue Screen View will scan the Windows dump files to determine the device drivers that possibly caused the crash.
Q7. It takes ages to copy files in Windows from one folder to another. The situation is marginally better in Windows 7 (over Vista) but still, is there a way to copy files faster?
A: You can use an external file copying utility like TeraCopy – this is not only copy /move files across drives faster but you can also resume broken file transfers (similiar to FTP operations).
Q8. I think I deleted a file by mistake. Can I recover it?
A: Recuva is a free software that will scan your hard drives, USB stick and other external drives for any deleted files that it can possibly recover. It may not work in all cases especially when you securely deleted a file.
Q9. Every time I copy something new to the Windows clipboard, the previous content gets erased. Can I make it permanent?
A: You can use Ditto, a free utility that sort-of adds memory to your Windows Clipboard. You can copy anything to the clipboard and it will stay there as long as you want.
Q10. How do I protect files and folders on my computer?
A: While there are free tools like Hide Folder that let you easily protect files and folders with a password, use TrueCrypt if you want a more secure solution. The obvious downside with a program like TrueCrypt is that if you forget the password, it is nearly impossible to retrieve the protected files.

Continue Reading | comments

Windows7 installation Step By Step

10 October, 2011


Just like another operating system Windows 7 also has some kind of hardware requirements. Make sure your computer is ready to install Windows 7.


1 GHz 32-bit or 64-bit processor.
1 GB RAM for 32-bit Windows 7 OR 2 GB RAM for 64-bit Windows 7.
16 GB available disk space 32-bit Windows 7 OR 20 GB for 64-bit Windows 7.
Support for DirectX 9 graphics with 128 MB memory (in order to enable Aero theme).
DVD-R/W Drive.
Internet or phone access to activate Windows 7.


Perform Windows 7 Clean Installation:

Clean installation is a process of putting an entirely new installation of Windows. In order to perform a clean installation of Windows 7, you should format and completely erase data on your hard drive. During a clean installation, the operating system files are installed in a new folder, and you must reinstall all of your applications and reconfigure user preferences, such as desktop and application settings.

On the other side when you upgrade, existing user settings are retained, as are installed applications and application settings. An upgrade is a new version of or addition to a hardware or, more often, software product that is already installed or in use.

Microsoft recommends you to upgrade your existing operating system to Windows 7, but if you are running Windows XP then you cannot go for this upgrade option. In that scenario you need to perform a clean installation of Windows 7. But don’t forget to take a backup of your data before you initiate a clean installation.


32-bit or 64-bit Version?


You need to decide whether to install the 32-bit or 64-bit version of Windows 7. The Windows 7 installation disc package includes both 32-bit and 64-bit versions of Windows 7. Basically, the 64-bit version of Windows handles large amounts of random access memory (RAM) more effectively than a 32-bit system. So if you plan on using Windows 7 on a computer with more than 3 GB or RAM, I would strongly suggest to use the 64-bit version. Most programs designed for the 32-bit version of Windows will work on the 64-bit version of Windows, and if they don't, you can always use Windows XP Mode.


Beginning the Installation Process


When installing on a physical computer insert your Windows 7 DVD media into your DVD drive and reboot your computer. If you're asked to press a key to boot from DVD or CD, press any key. A black window will appear momentarily while the DVD content is read.


Next, a Starting Windows screen will appear.


The Installation Process

Like in Windows Vista and Windows Server 2008, and unlike previous versions of Windows, Windows 7 does not have a noticeable text phase of the setup process, and it will boot directly into the Graphical User Interface (GUI) mode.


After a few moments you will see the first prompt:


Click "Next" unless you want to change some regional settings for the installation process. 


Click on the "Install now" button.

Next, accept the license terms and click on "Next".


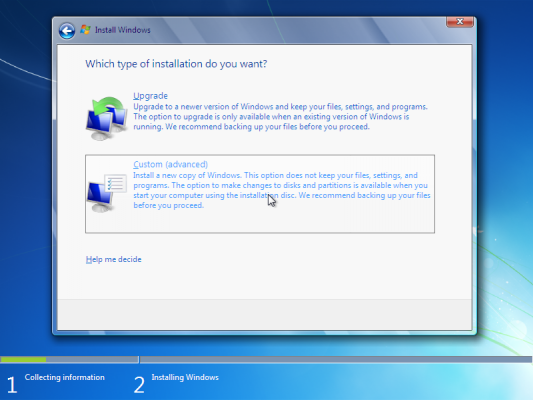
Next, unless you're upgrading an existing Windows installation, press the Custom (Advanced) installation type button. Note that in this case, the Upgrade button is disabled because this specific installation if performed on a new computer without any previous operating system on it.


The next phase is to pick the installation partition. Since this computer has a new hard disk that hasn't been formatted before, you will only have the option to create a new partition on it.
If you don't want to specify a specific partition to install Windows on, or create partitions on your hard disk, click Next to begin the installation. If you already have another existing partition with enough free space and want to install the Windows 7 on that partition to create a multiboot configuration, select the partition you want to use, and then click Next to begin the installation. If you want to create, extend, delete, or format a partition, click Drive options (advanced), click the option you want, and then follow the instructions.
Since I don't need to perform any additional task I will just click on the "Next" button. The installation process will then create a partition on all the available disk space, and format it.


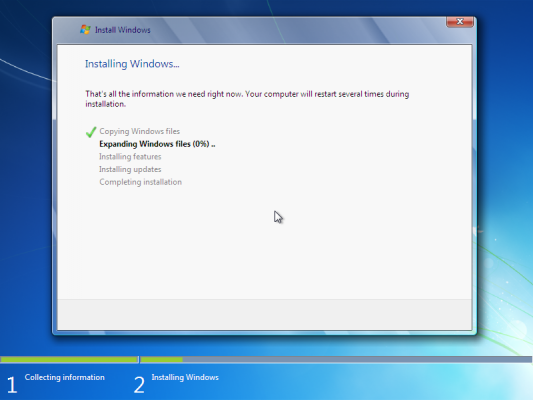
The setup process will now begin to copy files from the installation DVD media to the hard disk.


Process could take a while depending on the type of hardware your computer uses. In my VM test sample I've used for this demo, the entire process finished before I could finish writing the previous 3 paragraphs, so it could be pretty quick.
The computer will reboot, and the next thing you'll see is the prompt to set the user's and computer's name. By default, the computer's name will be username-PC, where username is the username you've entered.
Note: The user you're creating will be the only user currently available on the system. Like Vista, the built-in Administrator's account is disabled. 

Click on "Next".


Enter the user's password. Remember this password, as it will be the ONLY user on the system, and unless you create an additional user or enable the built-in administrator account, if you forget this password you'll need to crack it to gain access to the system.

You must also enter a password hint.

Click on "Next".


Next, type in your product key. If you do not have the product key at hand you can still click "Next", and proceed with the installation. You will be asked to enter the product key after Windows is installed.


Choose what sort of protection your computer gets. The recommended settings are best for someone that doesn't plan to hide their computer behind a corporate firewall (and even then, in some cases, this would be the best option). If you plan to install a 3rd-party firewall later you can opt to be prompted later. Note that this setting will also have effect on how the computer uses the Microsoft Windows Update (Automatic Updates) features.


Choose your time zone and location and click on "Next".


Select your network location type. This setting can be changed later, but do note that choosing a profile will have effect on the Windows Firewall and sharing settings. Click on "Next".


Windows will finalize the settings and your desktop will appear.


Continue Reading | comments

Drive encryption in Windows 7

29 September, 2011


Microsoft Bitlocker drive encryption is used to encrypt/lock any Local drive or removable drives like pendrives.Bitlocker encrypts the drives using 128 bit key.Once the drives are encrypted/locked it can only opened using the password.Microsoft introduced bitlocker encryption in windows vista.The bitlocker feature is currently available in Ultimate and Enterprise editions of windows 7 ,Vista as well as the Windows Server 2008 and Windows Server 2008 R2 .Bitlocker requires that your hard disk should have atleast two NTFS
drives :One of the operating system and the other with a minimum size of 100 MB.
Let’s Begin the step by step tutorial along with screenshots on how to Lock/encrypt Computer drives or pendrive in windows 7.
1.Plugin your Pendrive into your Usb port.
(Skip the above step if you want to lock/encrypt a local drive)
2.Click on Start button and type Bitlocker and click on BitLocker Drive Encryption
windows7bitlocker Encrypt/Lock Computer Drives Or Pendrive In Windows 7
3.Now you can see all local drives and your pendrive(If you have plugged in any)
bitlocker495x450 Encrypt/Lock Computer Drives Or Pendrive In Windows 7
4.Now click on Turn on BitLocker in front of the drive you want to lock/Encrypt.
5.Now it will ask you to choose your password
bitlockertogo03 Encrypt/Lock Computer Drives Or Pendrive In Windows 7
6.Once you have entered your password click Next you will be now asked to save the password or take a print out.
bitlockertogo04 Encrypt/Lock Computer Drives Or Pendrive In Windows 7
Note:If you save your password in your computer then make sure that it at some safe place.
bitlockertogo05 Encrypt/Lock Computer Drives Or Pendrive In Windows 7
7.Now bitlocker will start encrypting your drive.The encryption time varies according to the size of the drive.
bitlockerdriveencryptio Encrypt/Lock Computer Drives Or Pendrive In Windows 7
8.If you have encrypted/locked  a local drive then you will see a lock in front of the drive.
bitlockerlockeddrive Encrypt/Lock Computer Drives Or Pendrive In Windows 7
9.If you have encrypted/locked a pendrive then you will see a bitlocker setup file when you put this pendrive in computer.Install this in another computer.
(If bitlocker is already installed in another system then this step is not required.)
10.Now it will prompt you to enter your password.
Continue Reading | comments
 
Copyright © 2011. Server Training . All Rights Reserved
Company Info | Contact Us | Privacy policy | Term of use | Widget | Advertise with Us | Site map