Your Ad Here
Your Ad Here

In Facebook

Popular Topics

ജാലകം
Showing posts with label Hardware. Show all posts

Difference Between Hub,Switch and Router

03 June, 2012


Hub


A common connection point for devices in a network. Hubs are commonly used to connect segments of a LAN. A hub contains multiple ports. When a packet arrives at one port, it is copied to the other ports so that all segments of the LAN can see all packets.


There are three main points to remember about hubs:
  • Many kinds of nodes can be connected to the hub with networking cable.
  • All hubs can be uplinked together, either with straight-through cable or cross-over cable, depending on whether or not the hub has an uplink port.
  • Performance will decrease as the number of users is increased.


When choosing a hub, the main consideration should be performance. If the hub is 100Mbps and there are five users, each user will receive only 20Mbps of bandwidth. If the hub is intended for a small network with very little traffic, this should not be a problem. However, if the network is large or expected to expand, a switch is a better option in the end.
When considering a hub, always remember that the network may expand in the future. Try to buy a hub that has enough ports to allow expansion without more hardware purchases. If expansion is not an immediate concern, remember that in the future you can add more hubs.
The standard hub is great for starting a small network, or providing a network to one department. There are two basic types: 10baseT, which will support a speed of 10Mbps; and 100baseTX, which supports 100Mbps. A standard 10baseT hub cannot connect to hardware that runs at 100Mbps unless a switch or hub with auto-sensing capabilities is used between them. If your network is small and will not require expansion in the near future, a standard hub is the perfect solution.


Switch


In networks, a device that filters and forwards packets between LAN segments. Switches operate at the data link layer (layer 2) and sometimes the network layer(layer 3) of the OSI Reference Model and therefore support any packet protocol. LANs that use switches to join segments are called switched LANs or, in the case of Ethernet networks, switched Ethernet LANs.


e


Switches also run in full duplex mode, which allows data to be sent and received across the network at the same time. Switches effectively double the speed of the network when compared to hubs, which only support half duplex mode.
A 10/100Mbps switch can also support hardware running at either 10Mbps or 100Mbps, allowing the continued use of older technology and delaying replacement.
Switches will increase the speed and efficiency of networks in any of the following situations:
  • Any network that calls for a 10/100 hub will benefit from a 10/100Mbps switch. The switch will increase available bandwidth, drastically increasing the speed that the network is running at.
  • Any network that requires enhanced performance for file servers, workstations, Web servers, etc. Any critical components should be connected directly to a 10/100Mbps switch.
  • Any network that uses high-speed applications including multimedia and video. Any workstation or file server using the intensive applications should be connected directly to a 10/100Mbps switch.
  • Any network that uses Fiber optic cabling should use a 10/100Mbps switch rather than a hub. A hub will not take full advantage of the speed possible with Fiber optic cabling.


Router


device that forwards data packets along networks. A router is connected to at least two networks, commonly two LANs or WANs or a LAN and its ISP.s network. Routers are located at gateways, the places where two or more networks connect. Routers use headers and forwarding tables to determine the best path for forwarding the packets, and they use protocols such as ICMP to communicate with each other and configure the best route between any two hosts


Continue Reading | comments (1)

How to Fix Msvcp71.dll and Msvcr71.dll missing error

29 December, 2011


Do you get Msvcp71.dll and Msvcr71.dll missing error when running a program in Windows 7? Both are Microsoft C Runtime Library files and it seems as if Microsoft forgot to add them to Windows 7. Some programs require you to have both files for it to work successfully.


We have uploaded both dll files for you(grab them from the bottom of this page),
but the bigger question is how to install them?
Before we begin, have a look at the errors in the screenshot below.
msvcp71.dll  - msvcr71.dll error windows 7

Installation In Windows 7 32-bit OS

If you are using Windows 7 32-bit then you need to put both dll files inside Windows/System32 folder as shown in the screenshot below.

dll files to system 32 windows 7

Installation In Windows 7 64-bit OS

If you are using Windows 7 64-bit then you need to put both dll files inside the Windows/SysWOW64 folder as shown in the screenshot below.


We have put both dll files inside one zip archive, simply extract them and follow the above guidelines to install them.

Download Link
OR

Mirror
Continue Reading | comments

How to Shrink System partition in Windows 7

14 December, 2011


The system partition (meaning the partition on which the operating system is installed on) is a place that just begs for more space as time goes by. In most cases, proper design before the installation of the operating system will prevent you from having to extend that system partition (read more about it in article on how to extend the system partition in Windows 7)


Previous Microsoft operating systems had some internal mechanism to shrink partitions. But there were limitations on these operations. Some 3rd-party applications could (and still can) be used to extend partitions, but in this article, like the one mentioned above, we want to focus on internal tools.

Windows 7 allows for an easy, out-of-the-box, method of shrinking partitions (any partition, including the system partition) and making them smaller.

2 Ways to Complete this task

1. Shrink with GUI interface:

1. Log on as an Administrator.

2. Go to Control Panel > System and Maintenance > Administrative Tools > Computer Management. You can also open the Computer Management application by using the Computer context menu. Select Computer Management.


In fact, you can go directly to the Disk Management MMC snap-in by typing diskmgmt.msc in the Start's search box or on the Run command.


If you're prompted for an administrator password or confirmation, type the password or provide confirmation.
3. Expand the Storage section, and in it go to the Disk Management console.


4. Select the disk you want to shrink, for example Drive C.
5. Right-click the disk and select Shrink Volume.


6. Process will take a few moments, while the system is looking at the partition structure. Note that it would be best to make sure that that partition was properly defragmented prior to trying to shrink it.


7. When calculation is done, the UI will display the largest amount of space that can be trimmed from the selected partition. Please note, again, that this size is related to the actual amount of free space on that partition (i.e. you cannot shrink more that there is free space), and the amount of file fragmentation on that partition.


Enter the amount in MB and click on the Shrink button.


8. The process will finish quite quickly, and a reboot is NOT required. You can notice the new partition size. Also note that you now have a remaining unused part on the hard drive.


Related:

2. Shrink with Command line interface: 

Extending a partition or volume can be done via the CLI, or command line interface. In order to do that perform the following steps:
1. Click Start and type CMD, then press Enter. It is best to run the Command Prompt as an Administrator. To do so, right-click CMD and select "Run as Administrator".
BTW, you can also hover over the CMD line and press CTRL + SHIFT + ENTER to invoke the "Run as Administrator" shortcut.
2. In the command prompt type
Diskpart
3. Select the right disk drive and partition to work on. Typically, in Windows 7, this should be disk 0 and partition 2, but please make sure you do select the right disk and partition before continuing. You can do so by performing a LIST operation to view your existing disks and partitions BEFORE attempting to expand the wrong partition.
List disk
Select disk 0
List partition
Select partition 2


4. When the right disk and partitions were selected, run the SHRINK command which reduces the size of the volume with focus by the specified amount, and makes free disk space available from unused space at the end of the volume.
SHRINK has some parameters we need to talk about:
DESIRED=<N> - Specifies the desired amount of space in megabytes (MB) to reduce the size of the volume by. If a desired amount is not specified, the volume will be reduced by the maximum amount of free space available on the volume.
MINIMUM=<N> - Specifies the minimum amount of space in MB to reduce the size of the volume by.
QUERYMAX - Returns the maximum number of bytes that the volume can be reduced by (the free space available on the volume). This value may change if applications are currently accessing the volume.
If a MINIMUM amount is not specified, the volume will be reduced by either the DESIRED amount (if specified), or by the maximum amount of free space available on the volume. If a MINIMUM amount is specified but not enough free space is available, the command will fail. This command works on basic volumes, and on simple or spanned dynamic volumes. You can reduce the size of a volume only if it is formatted using the NTFS file system or if it does not have a file system.

For example:
Shrink QUERYMAX
The above command will return the maximum number of bytes that the volume can be reduced.


shrink DESIRED=500 MINIMUM=250
Will shrink the partition by 500 MB, if possible, and if it cannot shrink by 500 MB, it will at least attempt to shrink it by 250 MB.
shrink DESIRED=10000
Will shrink the partition by 10000 MB.


5. You may check the new partition size by running the list command, again.
List partition


6. You must now exit DISKPART by using the Exit command.
Exit
BTW, as a general tip and so that you know, you can use the above procedures also on Windows Vista, Windows Server 2008 and Windows Server 2008 R2.

Related:

Drive Encryption in windows 7
Network topology
Common Installation Errors in Windows 7
Continue Reading | comments

Command Prompt errors & solution in Networking

05 December, 2011


Common run Command Errors

A]    ipconfig — Media disconnected
Issue
  1. Cable not connected
  2. The device on the other side is turned off
Solution
  1. Check with different cables
  2. Turn on the other devices
B]    Ipconfig — Windows IP configuration
Issue
  1. N/w card is disabled
Solution
  • Enable n/w card
C]    Ping — destination host unreachable
Issue:
  1. The device you are trying to ping is turned off
  • The device you are trying to ping is not a part of the network
Solution
  1. Check the IP address
  2. Disable firewall on both ends
  3. Disable and Enable the N/w card
D]    Ping–Request timed out
Issue:
  1. Destination devices has received the packets but not responding to it
Solution
  1. Disable firewall
  2. Disable/Enable network card
E]    Ping — error code 64 or ping transmit error
Issue
  1. Because of firewalls specially zone alarm
Solution
  1. Disable firewall and zone alarm
Continue Reading | comments

How To Extend C Drive Capacity Without Format in Windows 7

17 October, 2011


When you are running out of space on boot partition, this post shows how to extend C drive in Windows 7. Most of the time C drive will be the system and boot partition, extending these type of partitions was not easy in earlier Operating Systems ,but Windows 7 supports extending system or boot partition without any third party tools with built in disk management.
It’s recommended to take backup before continue following steps, but it never fails.
In two ways you can extend C drive in Windows 7.
 Start-> Run 
type "Diskmgmt.msc" without quots or Rightclick My computer & click manage

1) Extending to unallocated space
2) Mounting in to empty NTFS folders in different partitions.
None of the methods require to convert disk to ‘dynamic disks’, so do it with basic disk.

Few Issues and Important Considerations

1) If you have two partitions C and D, D partitions should be deleted to create unallocated space next to C drive.
How to Extend C Drive in Windows 7
Make sure to take backup of your data on D before deleting it.
2) If you have 80GB hard disk and full space allocated as C drive then extending feature will not work. It requires empty space next on same physical hard disk. In this case we can use empty NTFS folder from different physical disk.
How To Do It???
1) Let me extent C partition in above example. ‘Extend Volume’ option is disabled in disk management when I tried without deleting D.  Take a full backup and delete the D volume.( Right click on volume and select delete volume)
How to Extend C Drive in Windows 7
Now, right click on C drive and select Extend volume.
How to Extend C Drive in Windows 7
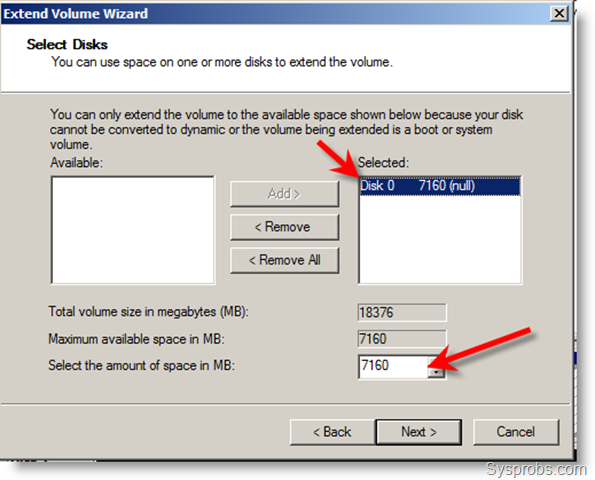
Add the available unallocated space in next screen. You can adjust the space to merge with C drive. Here I selected entire unallocated space.
add_free_spaceAfter successfully merged the free space, here is the extended partition.
How to Extend C Drive in Windows 7
Note: Once you allocated entire physical hard disk to C drive and no more partitions available next to it then ‘Extent Volume’ will be disabled. You can’t extend C drive to other physical disks.]
Follow NTFS Folder Method to extend C Drive to Other physical disk partitions


2) Lets assume, again my C drive is full and no partitions available on the same disk. So, I’m going to use NTFS folder method to extend it to other basic disk.
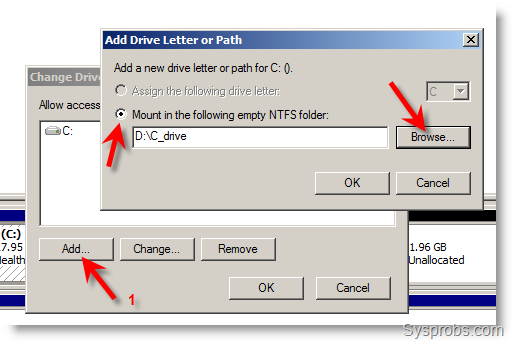
create_empty_folderNow, right click on C drive and select ‘Change Drive Letter and Paths’ option. Press Add and browse for the empty folder created in different partition. I created empty ‘C_drive’ folder on D drive physical disk.How to Extend C Drive in Windows 7You can’t see the immediate changes. If you go to D drive and look for the empty NTFS folder used to mount C, it appears as below.
mounted_folderOpening this icon will take to entire C drive on other disk.
Now C partition space = C drive + Free Space on D
I’m sure these two methods will be helpful to extend C drive in Windows 7 when you are running out of space.
Good thing is, it doesn’t require to convert to dynamic disk. Still if you don’t want to delete the next partition, then use empty NFTS folder to mount.

From: sysprobs.com
Continue Reading | comments

Windows7 installation Step By Step

10 October, 2011


Just like another operating system Windows 7 also has some kind of hardware requirements. Make sure your computer is ready to install Windows 7.


1 GHz 32-bit or 64-bit processor.
1 GB RAM for 32-bit Windows 7 OR 2 GB RAM for 64-bit Windows 7.
16 GB available disk space 32-bit Windows 7 OR 20 GB for 64-bit Windows 7.
Support for DirectX 9 graphics with 128 MB memory (in order to enable Aero theme).
DVD-R/W Drive.
Internet or phone access to activate Windows 7.


Perform Windows 7 Clean Installation:

Clean installation is a process of putting an entirely new installation of Windows. In order to perform a clean installation of Windows 7, you should format and completely erase data on your hard drive. During a clean installation, the operating system files are installed in a new folder, and you must reinstall all of your applications and reconfigure user preferences, such as desktop and application settings.

On the other side when you upgrade, existing user settings are retained, as are installed applications and application settings. An upgrade is a new version of or addition to a hardware or, more often, software product that is already installed or in use.

Microsoft recommends you to upgrade your existing operating system to Windows 7, but if you are running Windows XP then you cannot go for this upgrade option. In that scenario you need to perform a clean installation of Windows 7. But don’t forget to take a backup of your data before you initiate a clean installation.


32-bit or 64-bit Version?


You need to decide whether to install the 32-bit or 64-bit version of Windows 7. The Windows 7 installation disc package includes both 32-bit and 64-bit versions of Windows 7. Basically, the 64-bit version of Windows handles large amounts of random access memory (RAM) more effectively than a 32-bit system. So if you plan on using Windows 7 on a computer with more than 3 GB or RAM, I would strongly suggest to use the 64-bit version. Most programs designed for the 32-bit version of Windows will work on the 64-bit version of Windows, and if they don't, you can always use Windows XP Mode.


Beginning the Installation Process


When installing on a physical computer insert your Windows 7 DVD media into your DVD drive and reboot your computer. If you're asked to press a key to boot from DVD or CD, press any key. A black window will appear momentarily while the DVD content is read.


Next, a Starting Windows screen will appear.


The Installation Process

Like in Windows Vista and Windows Server 2008, and unlike previous versions of Windows, Windows 7 does not have a noticeable text phase of the setup process, and it will boot directly into the Graphical User Interface (GUI) mode.


After a few moments you will see the first prompt:


Click "Next" unless you want to change some regional settings for the installation process. 


Click on the "Install now" button.

Next, accept the license terms and click on "Next".


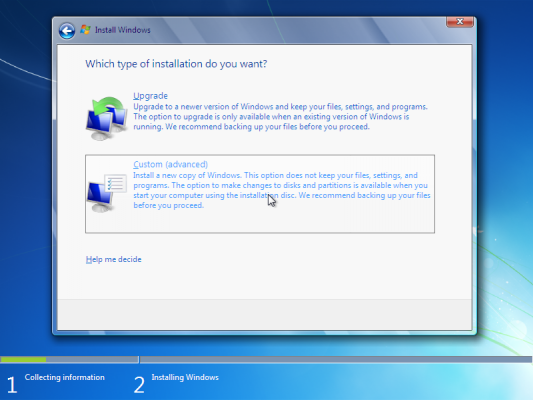
Next, unless you're upgrading an existing Windows installation, press the Custom (Advanced) installation type button. Note that in this case, the Upgrade button is disabled because this specific installation if performed on a new computer without any previous operating system on it.


The next phase is to pick the installation partition. Since this computer has a new hard disk that hasn't been formatted before, you will only have the option to create a new partition on it.
If you don't want to specify a specific partition to install Windows on, or create partitions on your hard disk, click Next to begin the installation. If you already have another existing partition with enough free space and want to install the Windows 7 on that partition to create a multiboot configuration, select the partition you want to use, and then click Next to begin the installation. If you want to create, extend, delete, or format a partition, click Drive options (advanced), click the option you want, and then follow the instructions.
Since I don't need to perform any additional task I will just click on the "Next" button. The installation process will then create a partition on all the available disk space, and format it.


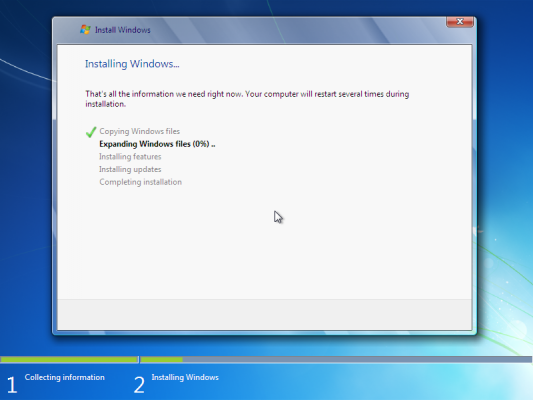
The setup process will now begin to copy files from the installation DVD media to the hard disk.


Process could take a while depending on the type of hardware your computer uses. In my VM test sample I've used for this demo, the entire process finished before I could finish writing the previous 3 paragraphs, so it could be pretty quick.
The computer will reboot, and the next thing you'll see is the prompt to set the user's and computer's name. By default, the computer's name will be username-PC, where username is the username you've entered.
Note: The user you're creating will be the only user currently available on the system. Like Vista, the built-in Administrator's account is disabled. 

Click on "Next".


Enter the user's password. Remember this password, as it will be the ONLY user on the system, and unless you create an additional user or enable the built-in administrator account, if you forget this password you'll need to crack it to gain access to the system.

You must also enter a password hint.

Click on "Next".


Next, type in your product key. If you do not have the product key at hand you can still click "Next", and proceed with the installation. You will be asked to enter the product key after Windows is installed.


Choose what sort of protection your computer gets. The recommended settings are best for someone that doesn't plan to hide their computer behind a corporate firewall (and even then, in some cases, this would be the best option). If you plan to install a 3rd-party firewall later you can opt to be prompted later. Note that this setting will also have effect on how the computer uses the Microsoft Windows Update (Automatic Updates) features.


Choose your time zone and location and click on "Next".


Select your network location type. This setting can be changed later, but do note that choosing a profile will have effect on the Windows Firewall and sharing settings. Click on "Next".


Windows will finalize the settings and your desktop will appear.


Continue Reading | comments
 
Copyright © 2011. Server Training . All Rights Reserved
Company Info | Contact Us | Privacy policy | Term of use | Widget | Advertise with Us | Site map