Just like another operating system Windows 7 also has some kind of hardware requirements. Make sure your computer is ready to install Windows 7.
1 GHz 32-bit or 64-bit processor.
1 GB RAM for 32-bit Windows 7 OR 2 GB RAM for 64-bit Windows 7.
16 GB available disk space 32-bit Windows 7 OR 20 GB for 64-bit Windows 7.
Support for DirectX 9 graphics with 128 MB memory (in order to enable Aero theme).
DVD-R/W Drive.
Internet or phone access to activate Windows 7.
Perform Windows 7 Clean Installation:
Clean installation is a process of putting an entirely new installation of Windows. In order to perform a clean installation of Windows 7, you should format and completely erase data on your hard drive. During a clean installation, the operating system files are installed in a new folder, and you must reinstall all of your applications and reconfigure user preferences, such as desktop and application settings.
On the other side when you upgrade, existing user settings are retained, as are installed applications and application settings. An upgrade is a new version of or addition to a hardware or, more often, software product that is already installed or in use.
Microsoft recommends you to upgrade your existing operating system to Windows 7, but if you are running Windows XP then you cannot go for this upgrade option. In that scenario you need to perform a clean installation of Windows 7. But don’t forget to take a backup of your data before you initiate a clean installation.
32-bit or 64-bit Version?
You need to decide whether to install the 32-bit or 64-bit version of Windows 7. The Windows 7 installation disc package includes both 32-bit and 64-bit versions of Windows 7. Basically, the 64-bit version of Windows handles large amounts of random access memory (RAM) more effectively than a 32-bit system. So if you plan on using Windows 7 on a computer with more than 3 GB or RAM, I would strongly suggest to use the 64-bit version. Most programs designed for the 32-bit version of Windows will work on the 64-bit version of Windows, and if they don't, you can always use Windows XP Mode.
Beginning the Installation Process
When installing on a physical computer insert your Windows 7 DVD media into your DVD drive and reboot your computer. If you're asked to press a key to boot from DVD or CD, press any key. A black window will appear momentarily while the DVD content is read.
Next, a Starting Windows screen will appear.
The Installation Process
Like in Windows Vista and Windows Server 2008, and unlike previous versions of Windows, Windows 7 does not have a noticeable text phase of the setup process, and it will boot directly into the Graphical User Interface (GUI) mode.
After a few moments you will see the first prompt:
Click "Next" unless you want to change some regional settings for the installation process.
Click on the "Install now" button.
Next, accept the license terms and click on "Next".
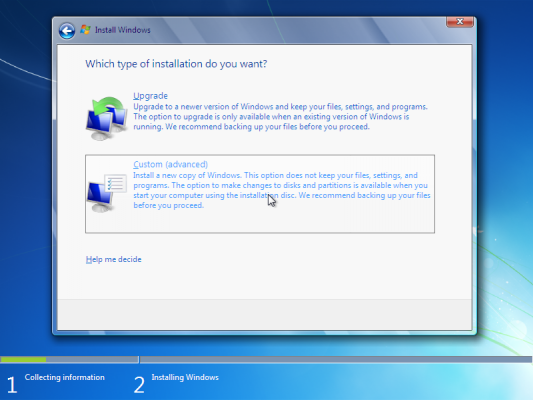
Next, unless you're upgrading an existing Windows installation, press the Custom (Advanced) installation type button. Note that in this case, the Upgrade button is disabled because this specific installation if performed on a new computer without any previous operating system on it.
The next phase is to pick the installation partition. Since this computer has a new hard disk that hasn't been formatted before, you will only have the option to create a new partition on it.
If you don't want to specify a specific partition to install Windows on, or create partitions on your hard disk, click Next to begin the installation. If you already have another existing partition with enough free space and want to install the Windows 7 on that partition to create a multiboot configuration, select the partition you want to use, and then click Next to begin the installation. If you want to create, extend, delete, or format a partition, click Drive options (advanced), click the option you want, and then follow the instructions.
Since I don't need to perform any additional task I will just click on the "Next" button. The installation process will then create a partition on all the available disk space, and format it.
The setup process will now begin to copy files from the installation DVD media to the hard disk.
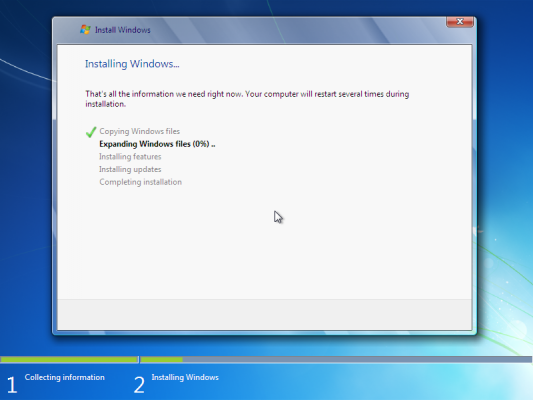
Process could take a while depending on the type of hardware your computer uses. In my VM test sample I've used for this demo, the entire process finished before I could finish writing the previous 3 paragraphs, so it could be pretty quick.
The computer will reboot, and the next thing you'll see is the prompt to set the user's and computer's name. By default, the computer's name will be username-PC, where username is the username you've entered.
Note: The user you're creating will be the only user currently available on the system. Like Vista, the built-in Administrator's account is disabled.
Click on "Next".
Enter the user's password. Remember this password, as it will be the ONLY user on the system, and unless you create an additional user or enable the built-in administrator account, if you forget this password you'll need to crack it to gain access to the system.
You must also enter a password hint.
Click on "Next".
Next, type in your product key. If you do not have the product key at hand you can still click "Next", and proceed with the installation. You will be asked to enter the product key after Windows is installed.
Choose what sort of protection your computer gets. The recommended settings are best for someone that doesn't plan to hide their computer behind a corporate firewall (and even then, in some cases, this would be the best option). If you plan to install a 3rd-party firewall later you can opt to be prompted later. Note that this setting will also have effect on how the computer uses the Microsoft Windows Update (Automatic Updates) features.
Choose your time zone and location and click on "Next".
Select your network location type. This setting can be changed later, but do note that choosing a profile will have effect on the Windows Firewall and sharing settings. Click on "Next".
Windows will finalize the settings and your desktop will appear.


 After successfully merged the free space, here is the extended partition.
 Now, right click on C drive and select ‘Change Drive Letter and Paths’ option. Press Add and browse for the empty folder created in different partition. I created empty ‘C_drive’ folder on D drive physical disk.
 You can’t see the immediate changes. If you go to D drive and look for the empty NTFS folder used to mount C, it appears as below.
 Opening this icon will take to entire C drive on other disk.


